WordPress website To set up your online store, you’ll need to follow a few simple steps. Firstly, you’ll want to get a domain name, then sign up for hosting, and finally, install WordPress.
Importantly, WordPress is a fantastic choice for creating your online store because it’s widely used, robust, and can grow with your business. However, to make it work effectively, you’ll also need reliable web hosting and some useful plugins.
Get A Domain Name And Web Hosting Provider
Domain Name: Add your domain name as your website’s unique address on the internet, like a home address.
Here are the simple steps to get started:
1. Choose Your Bluehost Plan
Go to Bluehost’s website and click on the big “Get Started” button.
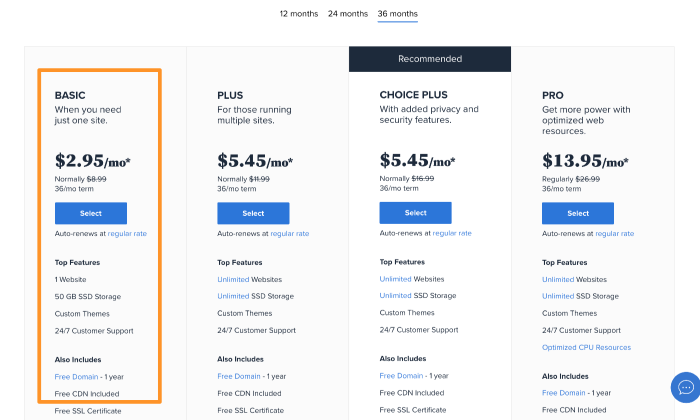
2. Pick Your Hosting Plan
Meanwhile, you’ll see four hosting plans to choose from. Since it’s your first time setting up an online store, I suggest going with the “Basic” plan, which costs just $2.75 per month and includes a free domain for one year.
3. Select Your Domain Name
Now, it’s time to choose a domain name for your new online store. Click on “Create a new domain” and type in the domain name you want. Furthermore, Bluehost will show you available domain extensions. Moreover, I recommend going for a.com extension, as it looks professional.
4. Enter Your Account Details
Fill in your personal information to create your Bluehost account. In addition, you’ll also need to confirm your plan details and choose any additional features (which might cost extra). Then, complete the deal.
5. Choose the subscription duration:
You’ll be asked to select how many years you want to sign up for Bluehost. Further, I recommend going for the three-year option because it offers the best value. It might seem like a long commitment, but it ensures your online store will be up and running for a good while.
6. Make the payment
Finally, pay for your subscription. You can use a credit card or explore other payment options.
Now, you’ve got your domain name and a hosting plan all set up. Your online store is on its way!
Register With A Hosting Service
When picking the best hosting provider for your website, you’ll need to consider the type of website you’re creating. In addition, avoid shared hosting.
Shared hosting means your website is on the same server as other websites, and if one of them gets hacked, it can put your site at risk too. This is especially risky if you’re dealing with sensitive information like credit card details. So, it’s better to steer clear of shared hosting to keep your site safe and secure.
-Advertisement-
Setting Up WordPress On Bluehost
The process of getting WordPress up and running on your Bluehost hosting account The best part? It’s completely free, and Bluehost will take care of the installation for you!
1. Sign Up and Get Credentials
After signing up with Bluehost, you’ll receive a confirmation email. In this email, you’ll find your login credentials. Keep them handy because you’ll need them to proceed.
2. Log In to Bluehost
Firstly, use the login information from your confirmation email to log in to your Bluehost account.
2. Start the installation
Furthermore, once you’re logged in, Bluehost will guide you through the WordPress installation process.
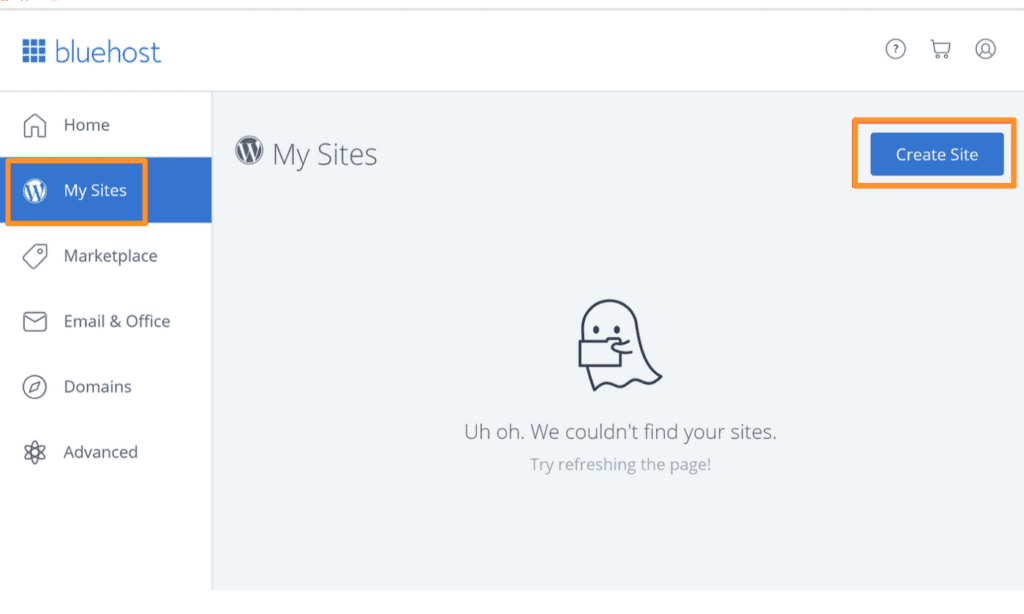
3. Alternative Installation Method
If you prefer to do it yourself, you can also install WordPress from your Bluehost dashboard. Simply click on “My Sites” and then select “Create Site.” This will kickstart the installation process.
4. Complete the Installation
The WordPress installation will be complete. At this point, you’ll be prompted to choose a name for your website. Then, create a username and a strong password for your WordPress admin area.
Meanwhile, with your blank canvas of a WordPress website all setup, you’re now ready to turn it into a fully functional eCommerce store!
Set up And Configure WooCommerce
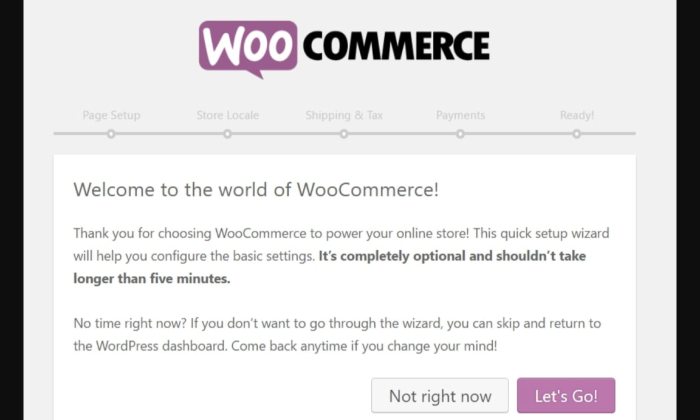
Step 1: Install and Activate Commerce
- Log in to your WordPress dashboard.
- Click on “Plugins” in the left-hand menu.
- Search for ‘WooCommerce’ in the search bar.
- Click ‘Install Now,’ and once it turns blue, click ‘Activate.’
- Commerce’s setup wizard will guide you through the rest.
Step 2: Add Business Details
- Fill out your business information.
- Choose if you’ll sell physical, digital, or both types of products.
Step 3: Select Payment Options
- Decide which payment methods to accept.
- Enable popular options like Stripe and PayPal.
- Moreover, you can add your accounts later if needed.
Step 4: Confirm Shipping Options
- Commerce sets your current location as the main ‘shipping zone.’
- Set fixed prices, offer free shipping, or integrate with carriers like UPS for live rates.
Step 5: Choose Complementary Plugins or Theme
Additional recommended plugins and whether to use Commerce’s theme
Further, you can add plugins and themes later, so skip this if you’re unsure.
Step 6: Activate Jetpack
Activate Jetpack to simplify payment setup and automate taxes.
Click ‘Continue with Jetpack.’
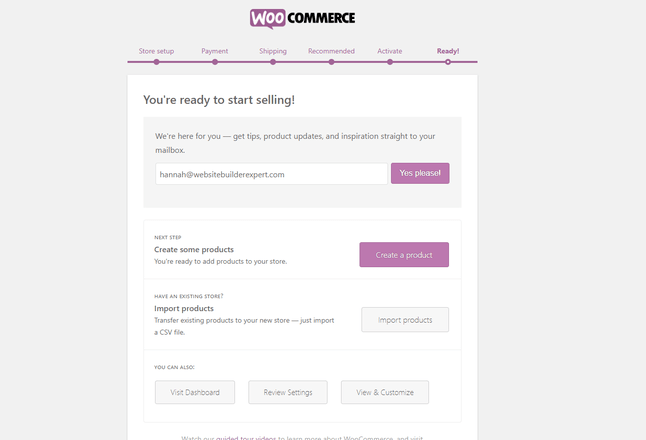
That’s it! You’ve completed the basic setup.
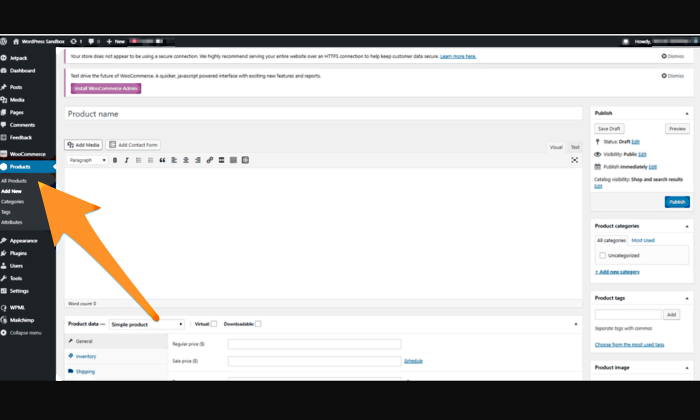
Create A New Product
Follow these simple steps:
Go to the “Products” tab and click on “Add New.”
Fill in the product details, paying special attention to these key areas:
Title: Give your product a catchy name.
Short and long description: Describe your product briefly and in detail.
Price: Set the product’s price.
Product image: Upload an appealing image of your product.
Categories: categorize your product for easy browsing.
Tags: Add relevant tags to help users find your product.
Type: Choose whether it’s a simple product or one with variations (e.g., different sizes for a t-shirt).
Further, You can also use the tabs in the “Product data” box to configure additional details like inventory, dimensions, linked products, and more
Once you’re satisfied with how your product looks, click the “Update” or “Publish” button, just like you would for a blog post.
Supercharge Your Commerce Store
Moreover, running an online shop with Commerce means that you can make it even better with a bunch of handy add-ons.
Payment Gateways: These are like magic doors that allow you to accept payments in various ways, not just through PayPal.
Shipping Extensions: These are super helpful if you want to connect your store with shipping rates from big players like FedEx and UPS without breaking a sweat.
Commerce Subscription: With these, your customers can subscribe to your products or services by paying a set fee.
TaxJar: This little buddy takes care of all the sales tax stuff for you, so you don’t have to worry about it.
Accounting Extensions: These make your life easier by connecting your online store to your favorite accounting tool.
Commerce Bookings: If you offer services that require appointments, these extensions let your customers book right from your website.
Make Your WordPress Website Accessible To The Public
Meanwhile, if you’re satisfied with how your website functions, it’s time to share it with the world.
- Click on ‘Settings’.
- Go to ‘Privacy’.
- After uploading your privacy policy, you’ll find the option to make your site ‘Public’.
Conclusion
Finally, you’ve successfully set up your own online store using WordPress. Building an e-commerce site with WordPress can be a breeze with the right guidance.
Lastly, to keep your online store thriving, remember to regularly update it with compelling content that convinces visitors to make purchases. Moreover, don’t overlook the importance of optimizing your product descriptions to improve your organic search rankings.
-Advertisement-
FAQ’s
Is WordPress free for eCommerce?
WordPress is free for eCommerce the core software is open-source, which means you can use it without any cost. In addition, you can set up and run an online store for free with WordPress.org, and you don’t have to pay for any additional features or add-ons. It’s a cost-effective way to create your own customized online shop.
Is it possible for me to create my own online store WordPress website?
Mainly, you can create your own e-commerce website. Here’s a simplified version of the steps:
- Get a custom domain name.
- Choose a user-friendly e-commerce platform.
- This should make it easier to understand and quicker to read.
What’s the typical timeline for creating an eCommerce website using WordPress?
Meanwhile, building an eCommerce website on WordPress typically takes anywhere from five days to five weeks, depending on your specific design and customization needs.
The total time to create an eCommerce site on WordPress varies, but it involves a few days for planning and a more significant period for customizing and setting up the website. Importantly, the exact duration depends on your project’s unique requirements and your team’s experience.